Step 1: Materials Selection (#materials)
Step 2: Discovering Inspiration and Choosing a Guide (#guide)
Stop 3: Preparing for the Journey (#prepare)
Step 4: The Sketch (#sketch)
Step 5: The Background and Major Landscape Features (#background)
Step 6: Adding Details (#details)
Step 7: Learning From Your Practice (#learn)
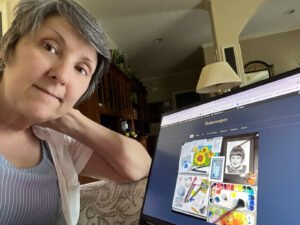
Are you ready for a 6 Supplies Challenge? Today’s post is the first of the Art Adventure series, and our mission will be to use six supplies or less (not including paper) to create a work of art.
I’ll go through the steps of selecting the materials, then show you how to find inspiration to get some ideas of what to do with them. Then we’ll go through each part of the adventure, exploring everything we can do with what we have while learning and expanding on our individual skill sets.
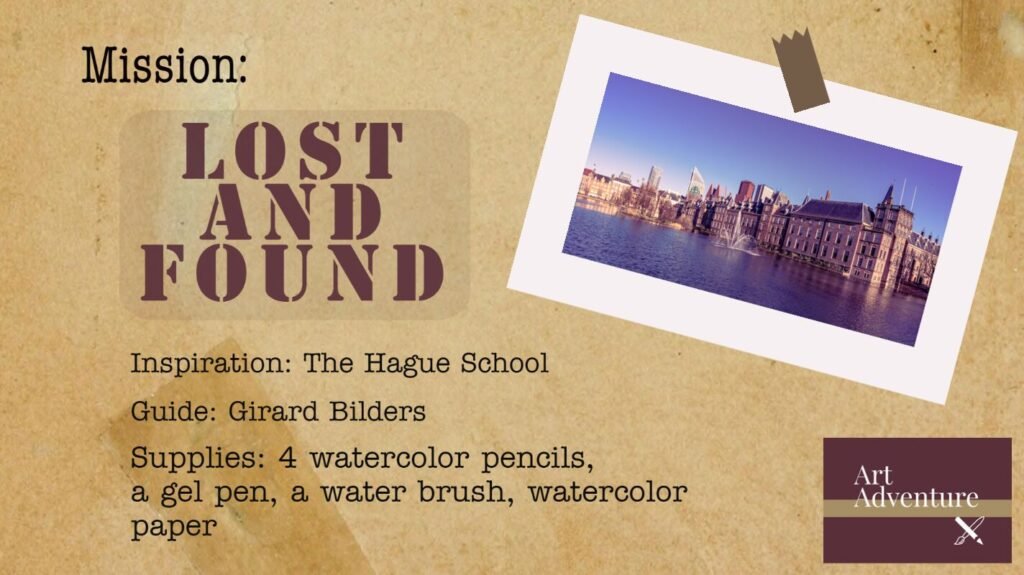
Today’s Mission: Lost and Found
Inspirational Art School or Movement: The Hague School
Guide: Girard Bilders
Supplies: watercolor pencils, a gel pen, a waterbrush and cold press watercolor paper
Duration: 2 hours
Allons-y! (Let’s go!)
Step 1: Materials Selection
Each Art Adventure Mission starts with a limited list of supplies. I’ve chosen mine using a Random Materials List Generator that I created for this purpose. If you’d like to set up your own Random Materials List Generator you can find my instructions here. Or you can follow along with what I’ve used in this mission.
We limit our supplies because
- a small palette will force us to learn color mixing skills
- It reduces the frustration of having too many options and
- It makes us focus on how to use what we have
For this mission, we are allowing ourselves six art supplies and a paper. Please don’t think you have to use the same exact materials that I chose. The most important aspect of this challenge is to use what you already have so that you can build your skills with the supplies you feel comfortable with.
However, with that said, I’ve listed substitutes in the table below if you want to follow along but need an idea of what else to use. Your only constraints are the four-colors limit of one media (I will use watercolor pencils), one color of another marking tool (mine is a gel pen), and a single applicator (I have a water brush).
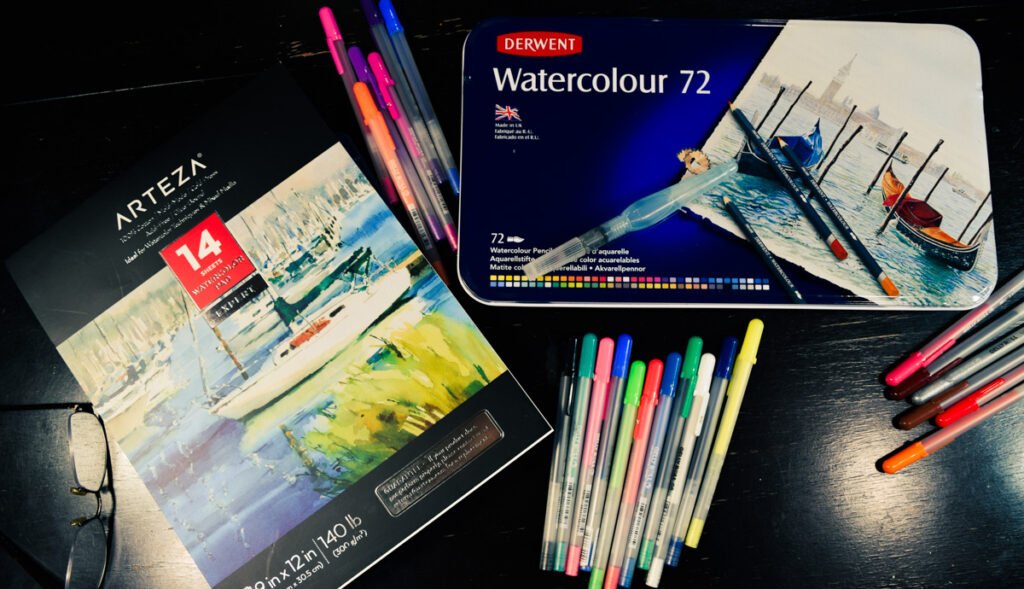
My Supplies
4 colors of watercolor pencil OR 4 colors of colored pencil OR 4 colors of pastel pencil OR 4 colors of colored charcoal
A waterbrush OR A water brush loaded with colorless blending solution or alcohol OR A dry brush or paper tortillon
A gel pen OR Any ink pen OR Any ink pen or marker
Before I choose the ground (the paper or canvas), I need to know what I want to do with these supplies. And I can’t choose my colors yet because we don’t know what the composition will be. Which leads us to the next step, Choosing Our Guide.
Step 2: Discovering Inspiration and Choosing a Guide
For this adventure, we’ll borrow an idea from the days of the Old Masters to take some of the frustration out of figuring out what to do with our limited supplies. Back in the Middle Ages, apprentices learned how to make art by copying well-known artists. This technique is still used today, however, we are going to try it in a slightly different way.
But before we do that, let’s recall what we know about the supplies we’ll be working with: watercolor pencils and a gel pen.
- Watercolor pencils can be used several ways. As a drawing pencil they create defined lines and structured shapes. Used with water (like watercolor paint) they’ll create big transparent washes and thick lines.
- A gel pen makes defined lines and lays down opaque color.
So what can we do with this information? Does this bring to mind any artistic techniques or principles we can practice?
My thoughts go to the technique of lost and found edges. The wet watercolor from the pencil can be used to blend color in ‘lost’ edges, and the pencil or gel pen could be used to define line in ‘found’ edges. Using this technique, we’ll get a good composition when the focal point is well defined with ‘found’ edges and the background and surrounding subject matter has impressionistic ‘lost’ edges.
If this sounds confusing, just keep going. It’s easier done than said!
Looking For Inspiration
Now we’re ready to look for inspiration. Some great places to start are online museums, art history books, or even Wikipedia. A website that I like to visit is called The Art Story (theartstory.org). So let’s try that first.
When I click into The Art Story’s homepage and scroll down, I’m drawn to an article about The Hague School. (Note: If you are following along and not seeing it, try using their search bar to find “The Hague School”). The paintings seem to have limited palettes, which make them perfect for our challenge. And even though there is a great amount of detail in some of them, most of the landscape compositions have large forms that would look just as good if they were blurry. This might be good inspiration for using lost and found techniques.
150121-3
Our Inspiration:
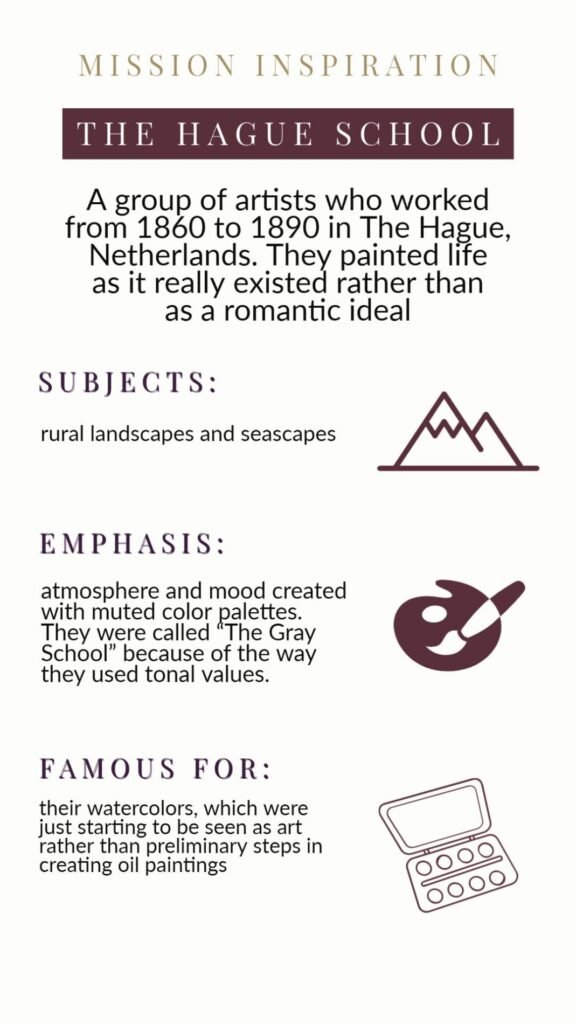
The Hague School was a group of artists who worked from 1860 to 1890 in the Hague in the Netherlands. These artists rejected the idealistic treatment of landscapes in favor of showing life as it really existed. Some important points about this art movement include
- Their subject matter included rural landscapes and scenes of coastal life
- They emphasized creating atmosphere and mood using muted color palettes and were called “The Gray School” due to the use of graduated tones to produce a subdued image
- They became known for their watercolors, which were beginning to be regarded as freestanding art rather than preliminary steps in creating oil paintings

In particular, I was drawn to a painting by Girard Bilders called “Cows at a Puddle”. Notice how the cows draw the viewer’s attention. Even though the landscape is quite lovely and has detail, I think it would be fine to recreate it in loose watercolor. The colors are muted and seem to run into each other. The palette is overwhelmingly green with some blue and browns.
This will be my inspirational piece, but it doesn’t have to be yours. Can you find a painting that inspires you in The Hague School? Is there another artist that you’d like to use for your guide?
My Guide: Gerard Bilders
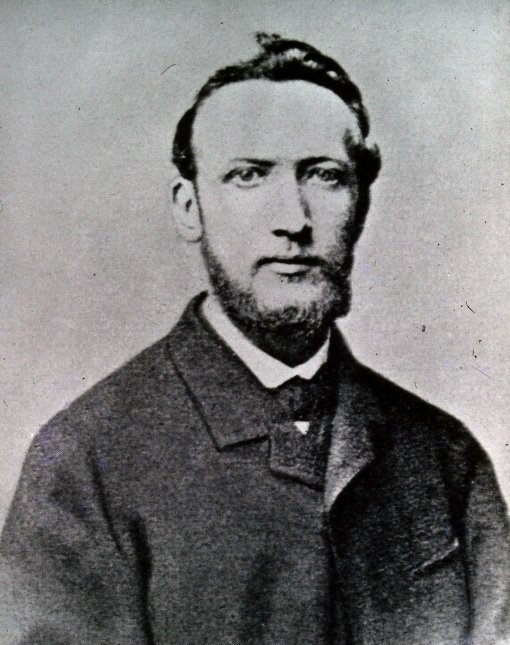
Gerard Bilders was born in Utrecht in 1838, son of landscape painter Johannes Bilders. In 1857, Gerard moved to The Hague and copied landscape paintings in the Mauritshuis Museum before visiting Switzerland to study under Charles Humbert, a landscape and animal painter. Bilders’ drew inspiration from his fellow artists and from the Barbizon School painters in France, who tried capturing atmosphere in their landscapes. Bilders died of tuberculosis when he was 26. He finished Cows at a Pond when he was 20 years old.
Step 3: Preparing for the Journey
Using Cows as our template, we can decide that most of the details of today’s artwork will focus on a relatively small area in the center of the composition. All of the landscape around it will be loose and impressionistic. This will let us take advantage of the materials we’ve chosen.
Now it’s time to make some decisions. What colors should we use? Since we only have one gel pen, where can we use it to maximum effect? What paper will we use?
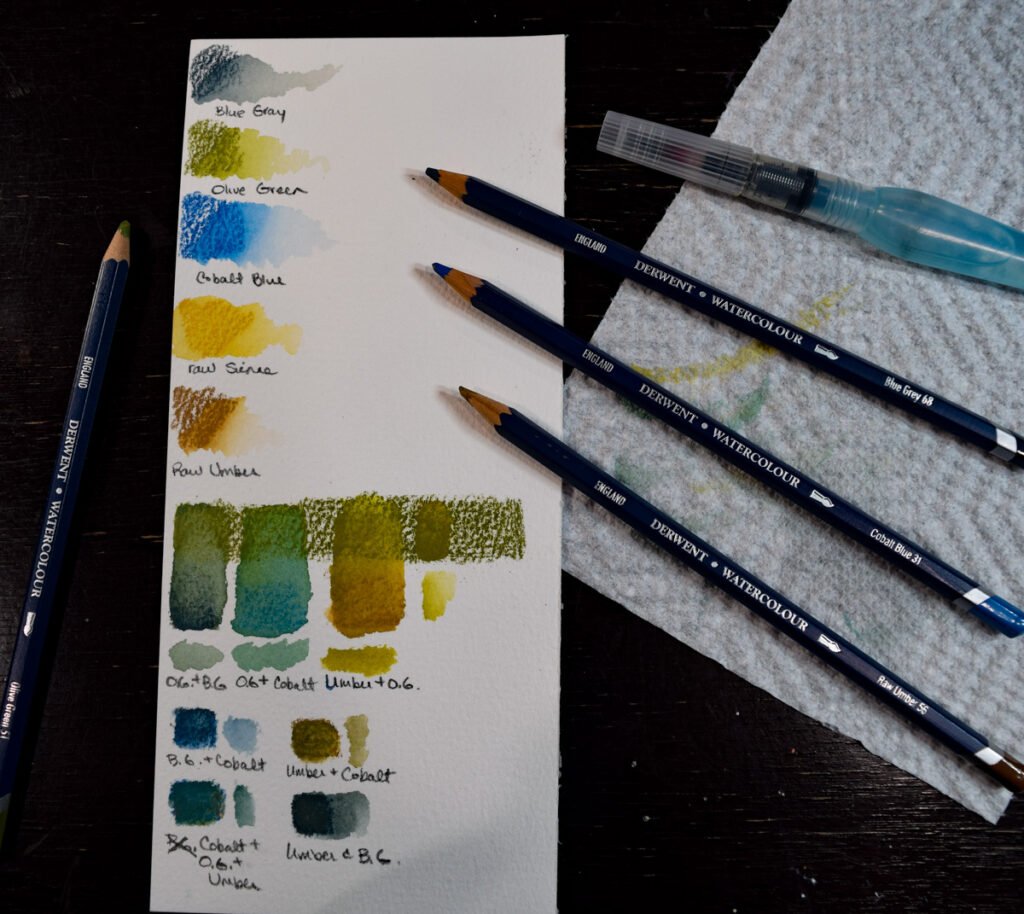
Color selection
At first I chose these four colors of watercolor pencil. I am using Derwent Watercolour pencils; your color choices may differ depending on what brand of pencil you have:
Cobalt Blue #31
This is what I see in the sky. It is a primary color so it will be a good base for mixing other colors.
A gray could be used for the sky but would change the mood. It would also lend tonal value to other colors.
A gray-green or blue-gray could also be used for the sky. It would change the mood and it would also give me a green to use in the landscape.
Olive Green #51
The highlighted greens in the inspiration painting have a warm light but the overall tone of the painting is cool. Using olive green by itself will produce a warm color; mixing it with my cobalt blue will make it cooler.
Any yellowish green would make a good alternative as long as it is not intense. We want to try and keep the palette muted.
Raw Umber #56
I tried Raw Sienna #58 prior to this Raw Umber. I was looking for a yellow that could be mixed with the blues. But I also needed a color that I could use for the cows. I preferred the Raw Umber.
Raw Sienna, Yellow Ochre, or another yellowish brown
Blue Grey #68
I need a dark color that will mix with the others to reduce their saturation levels and create a black.
Other dark greys would work, but I would avoid black. The blue grey has the advantage of producing more green mixtures. Other greys might result in mixes of violets, pinks or oranges, depending on their shade and the colors already chosen.
I am now leaning towards using a brown, black or white gel pen, but will leave that decision for later. I don’t foresee using it until I get to the end of today’s painting.
Applicator
I have a Pentel waterbrush with a large, round tip. I’m seeing large areas of bulbous shape in the inspiration painting and want to make many “lost” edges in mine, so I’m not interested in using an angular or flat brush. I’ve filled the handle of the brush with water. I’ve also grabbed a handful of paper towels for wiping up spills or drying the brush.
Paper
I’ve decided to go with cold press watercolor paper because I want impressionistic, rough-looking shapes for most of the picture. I realize that, depending on the size of the paper, I’m going to lose all ability to get precise details with my lines. But that’s okay – it will make this challenge more fun. I’m using Arteza brand because it is relatively inexpensive and 100% cotton. It will hold a lot of water. Since we are going to have a lot of water control with the water brush, a wood-pulp watercolor paper (I’m thinking Canson XL) probably would work fine, as well. There’s no need to use expensive paper for this project.
Before we go on, make sure to have a piece of paper that you can use for your artwork and the same kind of paper to use for practice swatching. I sliced 4” off the end of a 9 x 12 sheet, leaving 8” for my artwork and 4” for a swatch page.
Take a Step Back
Let’s pause a moment to see where we are and how we got there. Was any of this hard to follow? Does it take away some of the fear of seeing an empty white paper and a pile of art supplies? So far, we’ve done nothing more than make a few decisions.
- We chose supplies randomly
- That decision led us to the idea of lost and found edges, so we looked for a picture that might work with that technique
- We used that picture to select colors, a brush, and paper
- Every step we take from here will be made because of these choices. Our mission will be to figure out what we like or don’t like about these choices.
Exploring The Selections
What can we do with the choices we made? Let’s find out!
- Using your swatch paper, scribble out a block of each color. Try making a solid rectangle, with a heavier application of color at one end. Gradually lighten the pencil as you color your way to the other end. How many gradations of color can you get?
- Make another swatch of each color, but this time use the waterbrush to pull the color out. How many gradations of color can you get using this technique? Can you make a puddle of paint and use the brush to paint it elsewhere on the paper?
- Try mixing two of your colors on the paper. What do they look like? What happens when you blend the with water? Can you use that as a puddle of paint to paint with?
- Can you mix three colors? What happens if you mix four? You might find that you get something resembling mud once you try mixing all four colors. But mud can be useful…
- It’s handy to label each mixture, especially if you’re getting colors you know you’ll need to use in your painting. I simply labeled mine with the initials of the colors I used.
- If you’ve selected a colored gel pen, try drawing a line on the swatches you’ve made. Do you like the result? What happens if you color a block of gel pen on the watercolor? Or vice versa?
Once you’ve spent some time exploring your colors, you’ll have a better idea of the range your palette can produce in your artwork.
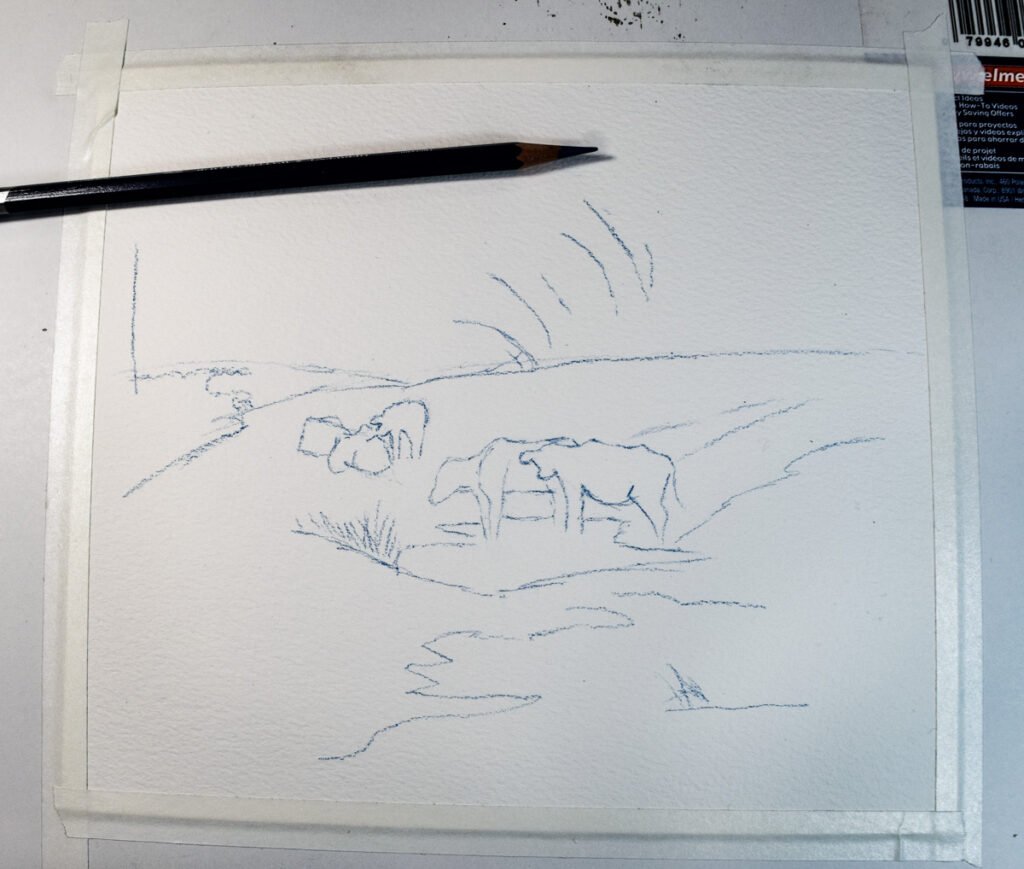
Step 4: The Sketch
I’m not going to explain how to sketch your drawing. There are many methods of doing so, including a freehand sketch, using a grid, tracing a photo, or using a projector. What you choose to do depends on decisions like how closely you wish to copy the original and what you feel comfortable with.
For me, I’m happy establishing a horizon line, sketching in a few of the major bushes, and putting down lines for the water and the path going from the cows to the right edge of the paper. If I make this too detailed I’m likely to want to keep adding detail when I paint, which is contrary to my goal of keeping the background loose. I do spend a couple of minutes drawing out cows, but, as I predicted, the cold press paper is too rough to do much more than make blocky shapes.
Now it’s time to tape the paper to my board and get ready to paint. I use artist’s tape for this, but I’ve known artists who use washi tape and even Scotch tape. Do I need tape? Not really. I don’t expect to be using so much water that my paper will buckle, and that’s the primary reason for taping it down. However, I like the border edges that the tape makes, so I’m going to do it anyway.
150121-7
Step 5: The Background and Major Landscape Features
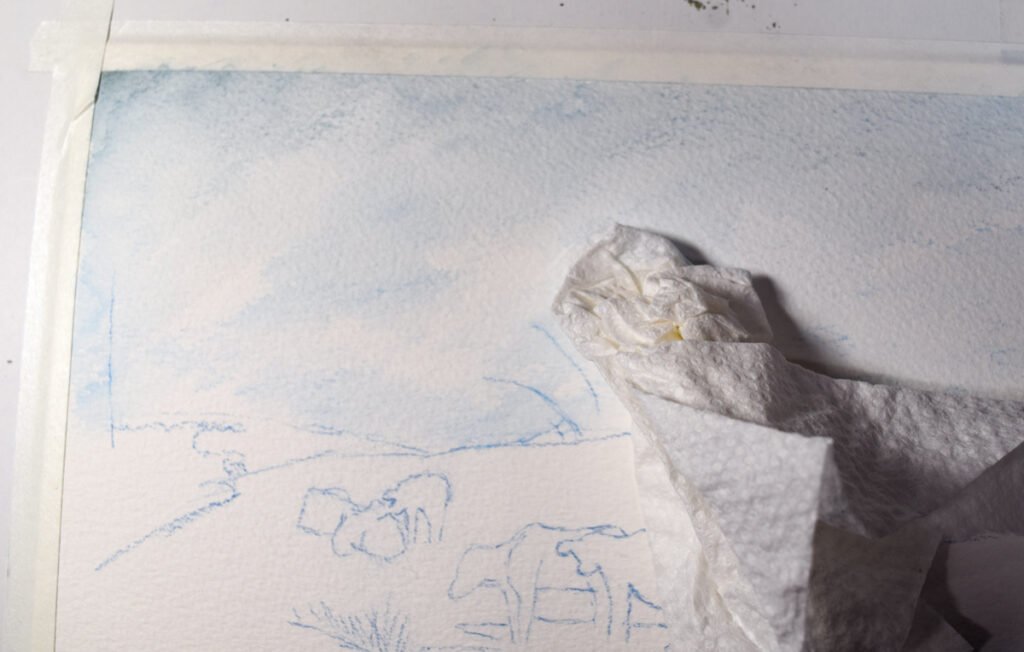
Believe it or not, this is the easiest part of the work. Scribble a little of your blue onto the sky and use a lot of waterbrush to wash it out. I took a bit of paper towel to blot parts of the sky and make clouds. I also used the blue gray pencil to add some darker tone to the top of the sky, then wet it and blended it in.
Using thin washes of color, I put in the background shrubbery, keeping the shades toward the blue end of the spectrum. This was done by using light applications of pencil on the paper and washing it out in the same manner as the sky. Once it dried, I built color into the largest tree-shrubs by adding dry pencil, then washing it out to blend the colors together. The entire time I’m working, I’m thinking that I don’t want to make any hard edges or distinct lines. Everything needs to blend.
I work this way in sections across the paper. By now, I’ve realized where my light source is striking the subjects. In these highlighted areas, I’m primarily using the olive green and raw umber pencils. In the shadowed areas, I’m using all four colors.
I put in an underlayer of blue where the water sits.
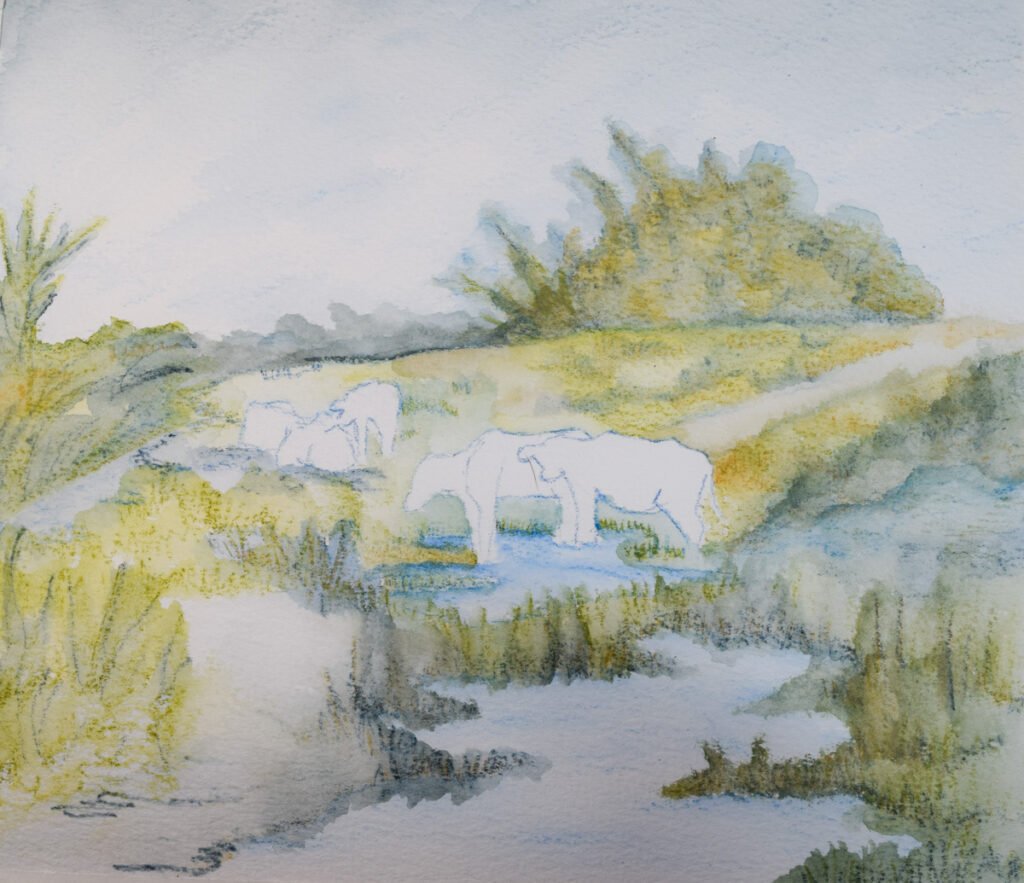
Once all of the landscape is blocked in (avoiding the focal point), I no longer needed to look at the inspiration painting. This is a good time to put Bilders’ painting aside and resolve to continue on using only what you know. This, friends, is where the real growth happens.
It’s time to go back over each section and add more depth. This time I use the pencil as a drawing tool. What do I mean by this? In the areas that are grass, I make short vertical strokes as if drawing grass. In the areas that are shrubbery, I make scribbled marks like I’m sketching odd bunches of leaves or branches. Again, I blend it all out with the waterbrush so that very few of those marks can be seen. But putting the color on using this technique has let me see how I can get the impression of swaths of grass and clumps of bushes. It seems to work. I also find that jiggling the waterbrush in a vertical motion or swirling it in a push and pull motion gives me some lovely variations in color that resemble foliage.
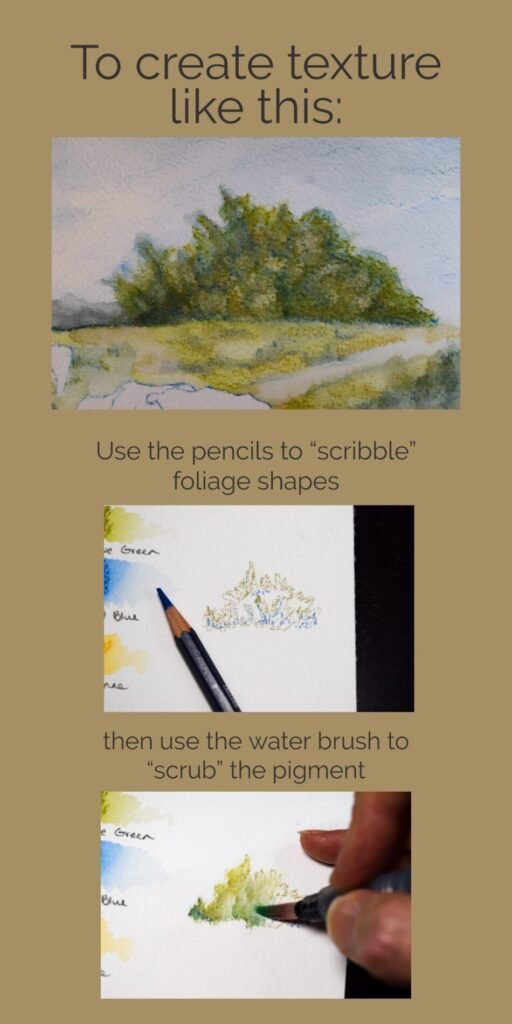
But these are experiments that I do based on my personal experience. What can you do? How can you hold your brush to make the marks look interesting? Do you want to wash out the marks or do they look good as they are? Explore and have fun!
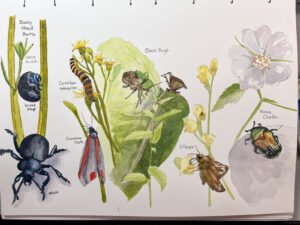
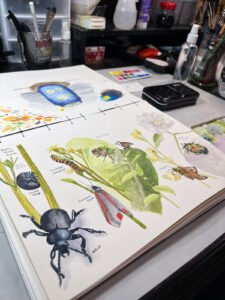
Step 6: Adding Details
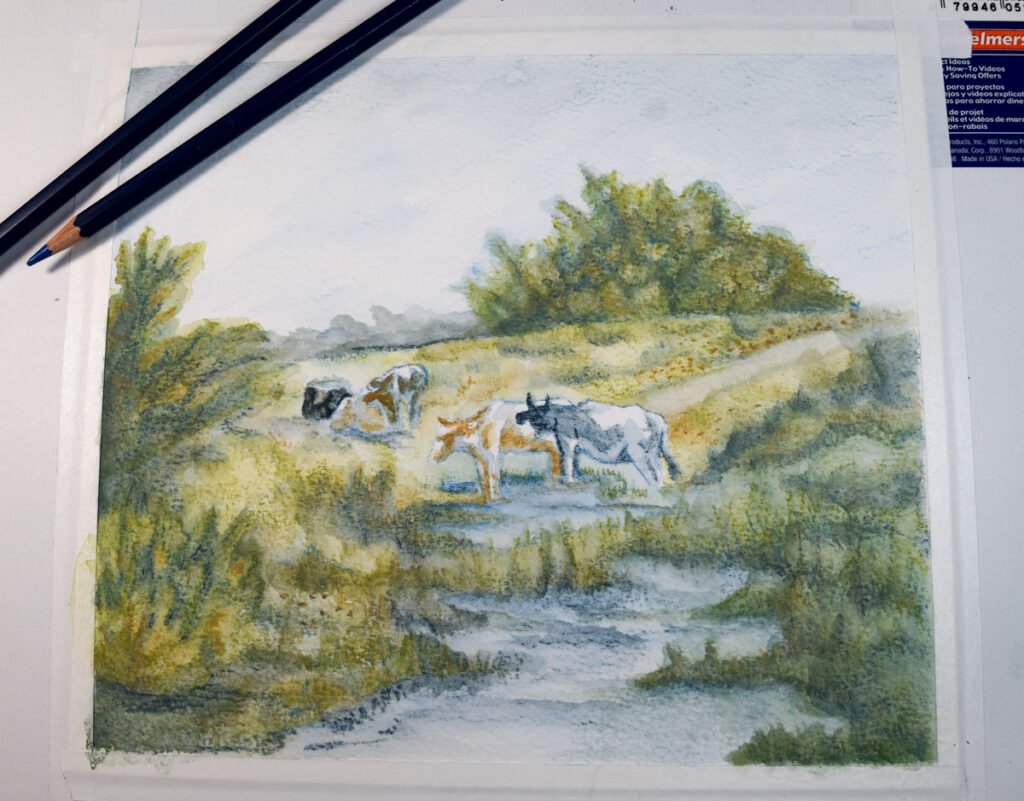
By now the cows are demanding my attention so I decide to try the smaller cows in the back first. To my dismay, applying the dry color on first and wetting it on the paper produces the same results as it did with the landscape. I should’ve thought this through first! For the front cows, I smartened up and made a puddle of color on my practice page, then used the brush to apply the color to the cows. It gave me more control with where the color went on the paper and I could layer in translucent shadows much better.
Now it’s time to step back and see what’s happening in the artwork.
I like how the shrubbery on the right is drawing the eye to the cows. I like how the road draws the eyes from the cows to the trees in the background and back to the cows. The composition is good, but I can’t take credit for it since I copied it from Bilders.
I also like how the colors in the landscape are blending.
I can’t seem to get any fine edges into the cows. I add a few more thin shadows of blue gray to give them some form.
Then I realize I still have to use the gel pen.
What can I do? I choose the white pen and add some thin lines to the water as ripples. Then I try putting thin lines onto the backs of the cows. It helps, a little. But finally I use the dark blue gray to add some edges to the cows. It was the only way to separate them from the background.
Here are my results:
Step 7: Learning From Your Practice
This is the last stop on our adventure today. We’ve gone through this journey and had a great adventure, and now we have a souvenir: our artwork. But what did we get out of the experience?
- Did you learn something about the media you used? I learned that watercolor pencil is really versatile. But it isn’t good for detail work at the scale that I was using on cold pressed paper. That’s something to keep in mind for the future. I also learned that gel pen works well on the pencil, but pencil on gel pen doesn’t work on cold press. And I like how raw umber mixes with olive green to make a golden green.
- Did you learn a few new ways to apply the media? I learned that I could use watercolor pencil as a paint by mixing the color on a scrap paper and applying it with a brush. I learned that I could push the dry pencil around with a waterbrush and create interesting texture.
- How could you improve what you did today? This question requires the most thought. I think the biggest improvement would come from using a larger piece of paper and working at a larger scale. The background would’ve come out very similar to what I made today, but the focal point would’ve been able to have more detail.
Things I learned from the Lost and Found Mission:
If I want to create something with a limited number of supplies, watercolor pencils are very versatile but are probably not going to give me good detail at a small scale. Use a waterbrush sparingly to push the pigment around on the paper or judiciously to create large translucent washes. Applying dry color to draw in grass and shrubs, then wetting it, gives a nice impressionistic result of landscape features.
Challenge yourself and try this out! If you do, let me know how it goes. I’d love to see all the creative ways you use this guide!